The Best Fluffy Pancakes recipe you will fall in love with. Full of tips and tricks to help you make the best pancakes.

Easy No-Bake Cherry Cheesecake Lush: A Dreamy Layered Dessert
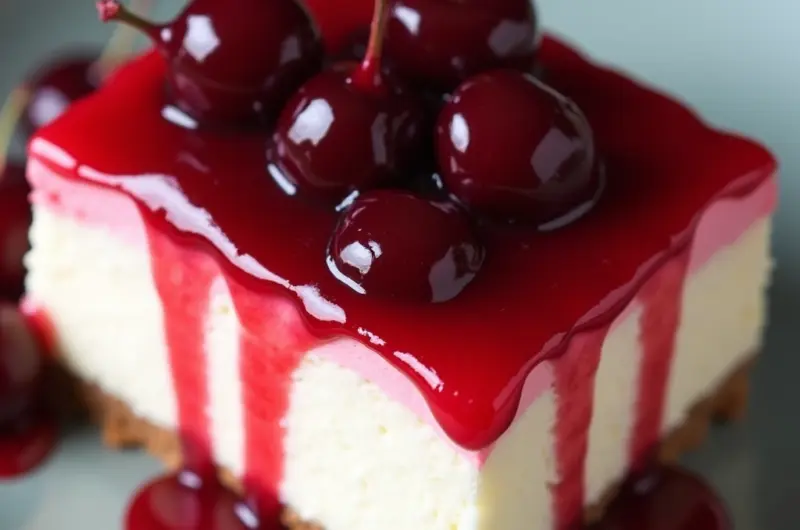
There’s something magical about the combination of tangy cheesecake and sweet cherries that makes any dessert irresistible. If you’re craving these classic flavors but don’t want to fuss with a traditional baked cheesecake, I’ve got the perfect solution: Cherry Cheesecake Lush. This no-bake wonder combines layers of buttery graham cracker crust, silky smooth cheesecake filling, and juicy cherries for a dessert that’s sure to become your new favorite.
Why This Cherry Cheesecake Lush Will Become Your Go-To Dessert
What makes this dessert truly special isn’t just its incredible taste – it’s also remarkably simple to prepare. You’ll love how the creamy cheesecake layer perfectly balances with the sweet-tart cherry topping, while the graham cracker crust provides that essential crunch we all crave.
The best part? No need to turn on your oven! This makes it perfect for:
- Hot summer days when you don’t want to heat up the kitchen
- Last-minute dinner party desserts
- Holiday gatherings when oven space is precious
- Any time you’re craving something deliciously creamy and fruity
Easy No-Bake Cherry Cheesecake
Course: DessertCuisine: AmericanDifficulty: MediumServings
12
servingsPrep time
20
minutesCooking time
4
minutesCalories
320
kcalIngredients
2½ cups graham cracker crumbs
½ cup unsalted butter, melted
- For the Cheesecake Layer
16 oz cream cheese, softened to room temperature
1 cup powdered sugar
1 package (3.4 oz) instant vanilla pudding mix
8 oz whipped topping
2 cups cherries (fresh or canned, drained)
Directions
- Prepare the Crust
- In a medium bowl, combine graham cracker crumbs and melted butter
- Mix until crumbs are evenly coated
- Press mixture firmly into the bottom of a 9x13-inch baking dish
- Refrigerate while preparing filling
- Make the Cheesecake Layer
- Beat cream cheese and powdered sugar until smooth and creamy (about 2-3 minutes)
- Add vanilla pudding mix and beat until well combined
- Gently fold in whipped topping until mixture is uniform
- Spread evenly over the chilled crust
- Add Cherry Topping
- Spread cherries evenly over the cheesecake layer
- If using canned cherries, ensure they are well-drained
- Chill and Serve
- Cover with plastic wrap
- Refrigerate for at least 4 hours or overnight
- Cut into squares and serve chilled
Notes
- For best results, let cream cheese come to room temperature before mixing
Store covered in refrigerator for up to 4 days
Can be frozen for up to 3 months; thaw overnight in refrigerator
Try different fruit toppings for variety
For a gluten-free version, use gluten-free graham crackers
Homemade whipped cream can be substituted for whipped topping
Key Ingredients for Success
Before we dive into the recipe, let’s talk about what makes each layer special:
For the Crust:
- Graham cracker crumbs create that classic, buttery base
- Melted butter binds everything together while adding rich flavor
For the Cheesecake Layer:
- Cream cheese provides that signature tangy flavor
- Powdered sugar sweetens while keeping everything smooth
- Vanilla pudding mix adds structure and extra creaminess
- Whipped topping makes it light and airy </ul>
- Fresh or canned cherries bring the perfect balance of sweet and tart
- Start with the crust: Mix graham cracker crumbs with melted butter until well combined. Press firmly into a 9×13-inch dish and refrigerate while preparing the filling.
- Create the cheesecake layer: Beat cream cheese and powdered sugar until smooth and creamy. Mix in vanilla pudding mix, then gently fold in whipped topping to maintain that light, airy texture.
- Layer it up: Spread the cheesecake mixture evenly over your chilled crust.
- Add the finale: Top with cherries, spreading them evenly across the surface.
- Chill to perfection: Cover and refrigerate for at least 4 hours, though overnight is even better.
- Make it ahead: This dessert actually improves after a night in the fridge
- Room temperature cream cheese: For the smoothest filling, let your cream cheese soften completely
- Crust consistency: Press firmly to ensure your crust holds together
- Cherry options: While fresh cherries are wonderful, drained canned cherries work beautifully too </ul>
For the Topping:
Step-by-Step Instructions
Let me walk you through creating this showstopping dessert: